Creating custom buttons for journals
No real journal coding tips in this article, but rather an overview of how to create a custom button or menu item for your journal.
Creating new menus/menu items and toolbars/buttons at the user level is really easy in NX. The three steps are as follows:
- Open the customize dialog
- Drag a new menu or button to the desired location
- Edit the menu or button for the desired action and icon/caption
Open the customize dialog
As is commonly the case in NX, there are multiple ways to get this done.
- On the menu, choose Tools -> Customize
- Use the default keyboard shortcut Ctrl-1
- Right click in the menu or toolbar area and select Customize

Drag a new button to the desired location
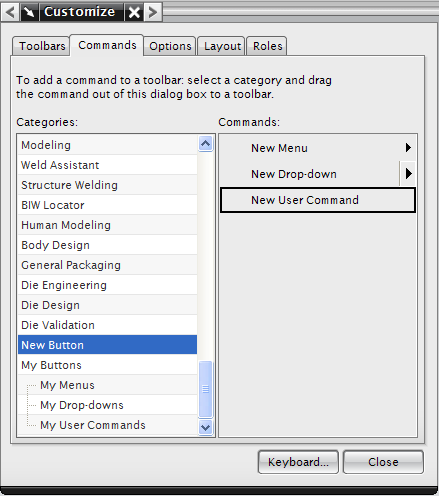
With the Customize dialog now open, switch to the Commands tab. In the Categories list scroll down and select New Button (it is near the bottom of the list). Click and drag the New User Command from the Commands pane to the desired location. A black bar will give a visual indication of where the new command will appear when you release the mouse button.

Edit the new button
Right clicking on the new command will bring up a menu that will allow you to customize its action along with its look and feel. Edit the Name of the button and press enter to activate the change. The name will show up on the button if no icon is specified or if you have enabled the text option. Change button image will allow you to specify an icon to use for your new button. A quick internet search will yield hundreds of royalty-free icons you can use, though it may be difficult to find one that sufficiently conveys what the button will do. Another search will yield several good choices for a "free icon editor" so you can make your own.
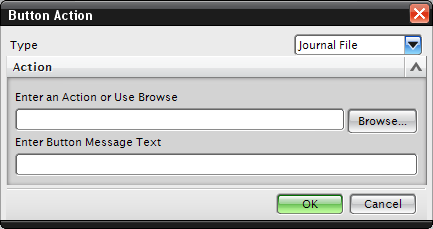
Finally, to associate your new button to your useful journal, choose Edit Action. This will bring up a new dialog box to further customize your button.

If necessary, change the Type drop down to Jounal File, then use the Browse... button to specify the location of your journal file. The "Enter Button Message Text" allows you to enter a quick description of what the button is for; this text will appear when you hover the mouse cursor over the button. When everything is as you want, OK the Button Action and Customize dialog boxes, then try out your shiny new button!
What's on the menu?
Creating a custom menu is similar and only takes an extra step or two. Open the Customize dialog box and scroll down to the New Button in the Categories list; click and drag the "New Menu" item to the desired position on the menu bar. Customize this entry to change the name, now click and drag "New User Commands" to your new menu. Customize the commands as previously and OK out of the dialogs.
Conclusion
The customizations as outlined here will only affect the machine you are working on. If you are the CAD administrator and would like to roll out a custom menu or toolbar for all the users; that's the job for some higher powered customizations. If you are in this situation, you'll want to peruse the "Menu Script" section of the NX help files and look in the .NET samples folder for some example files.

Comments
Is it possible to put a textbox onto toolbar?
Hello,
I need a textbox in toolbar. I want to write something into it. And after hitting enter it will run and the text will be input for the journal.
Thanks
re: textbox on toolbar
I don't know of any way to place a text box on a toolbar.
However, if you need text input from the user; you can display an input box when the journal code starts. See the tutorial:
http://nxjournaling.com/?q=content/user-input-input-boxes
button
how do you get the button to stay where you left it for the next time you open nx. It always disappears.
Moldmaker
re: new button
Check the setting in: Preferences -> User Interface -> layout -> save layout at exit.
This should be "checked". When you are done using NX, be sure to use File -> Exit or press the close button in the title bar. Don't simply power off the computer without first closing NX. I used to have a coworker that did this and he'd wonder why certain settings were not retained for him.
If you follow all the instructions above and the button still isn't being saved between NX sessions, it may be that you do not have write privileges to the user data folder. The location of this folder will depend on the version of NX you are using, but it will be something like: C:\Users\\AppData\Local\Siemens\NX90
Also, your IT support or CAD admin may have scripts running that interfere (either intentionally or not) with user customizations to NX.
Hi,
Hi,
In which .mem file information about custom button added in interactive session is stored ? I've checked many files from UGII/menus directory but I couldn't find data related to newly created buttton... Thanks for any help.
re: button location
If you add a button as described in the article, it will be saved in the "user.mtx" file. This file is located in your user folder, the usual location is something like:
C:\Users\{user name}\AppData\Local\Unigraphics Solutions\NX{version number}
or, if you are using NX 9 or later:
C:\Users\{user name}\AppData\Local\Siemens\NX{version number}
Thank you!
Thank you!